
Welcome to the definitive engineering guide for electrifying your Kross Level bicycle. The Kross Level is engineered as a lightweight aluminum cross-country hardtail optimized for climbing efficiency, steering precision, and structural rigidity across varied terrain. That same pursuit of low mass and pedaling stiffness — hydroformed tube walls, a compact main triangle, and tightly packaged bottom-bracket junctions — is exactly what makes a high-torque mid-drive conversion an engineering exercise rather than a parts swap.
A mid-drive motor does not merely sit in the frame; it converts the bottom bracket shell from a bearing housing into the primary structural anchor for up to 160 Nm of rotational force. Before ordering a single component, you must identify your exact Level generation and verify its bottom bracket standard, hub spacing, and frame material. The success of the entire conversion depends on it.
01. Compatibility Overview & Suitability Key
The Kross Level line is, structurally, one of the most welcoming conversion platforms in mountain biking: the overwhelming majority of Level frames are threaded-shell aluminum hardtails. The hardware decisions below hinge on three frame attributes — material, bottom bracket standard, and hub spacing.
| Status | Meaning | Engineering Reality |
|---|---|---|
| Status🟢 Perfect | MeaningIdeal conversion candidate | Engineering RealityThreaded aluminum shell. Drop-in fitment. Minimal or no adapter hardware. |
| Status🟡 Moderate | MeaningRequires specific hardware & care | Engineering RealityPress-fit shell or tight clearance. Bushings, spacers, and clearance verification required. |
| Status🟠 Advanced | MeaningCarbon frame / complex geometry | Engineering RealityDM02 only. Interface pads + 35–40 Nm lockring limit mandatory. |
| Status🔴 Not Recommended | MeaningHigh structural risk | Engineering RealityUncorrectable chainline, no braking/cable infrastructure, or ultra-thin layup. Do not convert. |
DM01 (160 Nm): High-output unit for aluminum frames only. Includes an integrated shift sensor that cuts motor power during gear changes to protect the drivetrain. This is the natural pairing for the aggressive climbing and trail use the Kross Level is built for — but only on alloy.
DM02 (90 Nm): The only motor approved for carbon frames, and an excellent choice on any aluminum Level where smoother delivery and lighter drivetrain stress are priorities. It has no shift sensor — the rider must momentarily release pedal pressure during every shift.
02. Kross Level Platform Engineering Analysis
Kross Level frames are cross-country hardtails: front-suspended, rigid rear triangles, designed to convert pedaling input into forward motion with minimal energy loss. This section examines the specific geometric and structural realities that govern how a mid-drive motor must be positioned, braced, and clearanced on a Level frame.
A. How Level design characteristics drive conversion outcomes
| Design Characteristic | Influences | Engineering Consequence |
|---|---|---|
| Design CharacteristicCompact XC main triangle | InfluencesBattery placement, motor positioning | Engineering ConsequenceDown-tube battery fits well on M–XL; verify clearance on XS/S where the front triangle is small. |
| Design Characteristic~447 mm chainstays | InfluencesMotor housing clearance, chainline | Engineering ConsequenceGenerous rearward room — the motor rotates cleanly up against the down-tube without chainstay fouling on most sizes. |
| Design Characteristic57 mm BB drop / 311 mm height | InfluencesGround clearance, pedal strike | Engineering ConsequenceAdequate clearance for the motor body off-road; confirm the housing does not hang below the chainring guard on XS frames. |
| Design CharacteristicHydroformed alloy tubing | InfluencesStructural durability under torque | Engineering ConsequenceIsotropic aluminum withstands the full DM01 160 Nm output without localized delamination risk. |
| Design CharacteristicBoost 148 mm rear | InfluencesChainline optimization | Engineering ConsequenceRequires a 9 mm-offset chainring to align the front ring with the outboard-shifted cassette. |
| Design CharacteristicSlacker trail geometry | InfluencesOff-road handling, weight distribution | Engineering ConsequenceAdded ~8 kg system mass lowers and rearwards the CoG — handling remains predictable; brake upgrade recommended. |
03. Model-by-Model Compatibility Lookup
Locate your Kross Level by tier and generation. Because the Level line is overwhelmingly threaded aluminum, most variants are 🟢 Perfect drop-in candidates. The decisive variables are (a) Boost vs. non-Boost rear spacing — which sets your chainring offset — and (b) aluminum vs. legacy carbon — which sets your motor ceiling. Always physically verify your own frame before ordering.
| Model / Tier | Category | Frame | BB Standard | Status | Approved Motor | Key Engineering Note |
|---|---|---|---|---|---|---|
| Model / TierLevel 1.0 / 2.0 / 3.0 (Gen 005–007) | CategoryMTB Hardtail (XC) | FrameAluminum Lite | BB StandardBSA 73 mm | Status🟢 Perfect | Approved MotorDM01 / DM02 | Key Engineering NoteDrop-in. Watch internal cable exits at BB shell. |
| Model / TierLevel 4.0 / 5.0 / 7.0 | CategoryMTB Hardtail (XC) | FrameAluminum (butted) | BB StandardBSA 73 mm | Status🟢 Perfect | Approved MotorDM01 / DM02 | Key Engineering NoteDrop-in. Verify motor clears SR Suntour fork crown lockout cabling. |
| Model / TierLevel Boost 1.0 / 2.0 | CategoryMTB Hardtail (Trail) | FrameAluminum | BB StandardBSA 73 mm | Status🟢 Perfect | Approved MotorDM01 / DM02 | Key Engineering NoteBoost 148 mm rear — 9 mm offset chainring mandatory for chainline. |
| Model / TierLevel PW / PW GL | CategoryMTB Hardtail (XC) | FrameAluminum | BB StandardBSA 73 mm | Status🟢 Perfect | Approved MotorDM01 / DM02 | Key Engineering NoteDrop-in. Rack-ready geometry suits commuter/bikepacking conversion. |
| Model / TierLevel (legacy carbon XC frame) | CategoryMTB Hardtail (XC Race) | FrameCarbon (~970 g) | BB StandardBSA 73 mm* | Status🟠 Advanced | Approved MotorDM02 only | Key Engineering NoteFull carbon protocol: interface pads + 35–40 Nm limit. DM01 prohibited. |
| Model / TierLevel — press-fit generation (if equipped) | CategoryMTB Hardtail | FrameAluminum / Carbon | BB StandardBB92* | Status🟡 Moderate | Approved MotorDM01 / DM02 (alu) | Key Engineering Note100 mm axle + CNC bushings + spacer kit. Verify shell type before ordering. |
*Bottom-bracket standard and frame material vary by model year and generation. Kross has historically specified threaded BSA shells across its alloy Level hardtails; a small number of higher-end or press-fit-equipped generations may differ. The shell must be physically inspected before any hardware is ordered — a smooth bore indicates press-fit, visible internal threads indicate BSA. See Section 04 for the inspection procedure.
A. Frame-Material × Bottom-Bracket Hardware Matrix
| Frame Material | BB Standard | Approved Motor | Required Axle | Mandatory Hardware |
|---|---|---|---|---|
| Frame MaterialAluminum | BB StandardBSA 68/73 mm (threaded) | Approved MotorDM01 or DM02 | Required Axle68/73 mm | Mandatory HardwareStandard Kit (drop-in) |
| Frame MaterialAluminum | BB StandardBB92 (press-fit) | Approved MotorDM01 or DM02 | Required Axle100 mm | Mandatory HardwareCNC Reducer Bushings + Spacer Kit |
| Frame MaterialCarbon | BB StandardBSA 73 mm (threaded) | Approved MotorDM02 ONLY | Required Axle73 mm | Mandatory HardwareProtective Interface Pads (35–40 Nm limit) |
| Frame MaterialCarbon | BB StandardBB86/92 (press-fit) | Approved MotorDM02 ONLY | Required Axle100 mm | Mandatory HardwareCNC Bushings + Spacer Kit + Interface Pads |
DM01 (160 Nm) is strictly prohibited on every carbon Kross Level frame, without exception. The 160 Nm torsional force induces interlaminar shear failure in the carbon layup and permanently destroys the bottom bracket shell. There are no exceptions based on model year, trim, or riding intensity.
DM02 (90 Nm) is the only approved motor for carbon frames. It must be installed with protective interface pads distributing the clamping load across the BB junction, and the primary lockring must be torqued to a strict 35–40 Nm limit using a calibrated torque wrench — never by feel.
B. Essential Hardware Checklist
- CNC High-Precision Reducer Support Bushings — mandatory for any press-fit (41 mm bore) shell. Machined metal sleeves that step the 41 mm bore down to the 33.5 mm motor axle, bridging the 7.5 mm gap. Plastic or 3D-printed substitutes are prohibited.
- 1 mm / 2 mm Precision Spacer Kit — mandatory on all 100 mm-axle (press-fit) installs to center the motor and guarantee full lockring thread engagement against the frame face rather than bottoming out on the axle shoulder.
- Protective Interface Pads — required on all carbon frames to distribute clamping loads and prevent resin fractures at the BB junction.
- 9 mm-Offset Chainring — required on all Boost 148 mm Level frames to restore correct chainline.
- Precision Torque Wrench — non-negotiable for carbon builds and strongly recommended for all builds to hit the lockring spec.
C. Critical Operational Rules
- The 3-Second Calibration Rule. After powering on the T24 display, keep all weight completely off the pedals for at least 3 full seconds. The torque sensor uses this window to establish its zero-load baseline. Violating it corrupts the reference point and causes erratic, unpredictable power delivery.
- Manual Shifting (DM02). The DM02 has no shift sensor. Consciously pause pedal input for a split second before every gear change to drop motor power to zero and protect the drivetrain. The DM01’s integrated shift sensor does this automatically.
- Internal Cable Discipline. On Level frames whose cables exit at the BB shell, route every cable around the motor body with protective conduit before tightening any hardware. A pinched cable’s tension is misread by the torque sensor as leg pressure, producing power surges.
- Boost Chainline Verification. On Boost frames, confirm the 9 mm-offset chainring is fitted and the chainline measures correctly before the first ride.
04. Bottom Bracket Compatibility & Conversion Engineering
The bottom bracket is the single most critical factor determining whether your TOSEVEN conversion succeeds or fails. On a Kross Level it is where the down-tube, seat-tube, and chainstays converge — and once the original crankset, spindle, and bearings are removed, this shell becomes the primary structural anchor for the motor’s full rotational output.
A. What the bottom bracket becomes in a mid-drive conversion
In a standard Level, the BB shell houses bearings that let the crankset spin. In a TOSEVEN conversion, the entire original crankset is removed completely. The DM01 or DM02 motor axle — manufactured to exactly 33.5 mm — slides directly through the empty shell, and a large steel lockring threads onto the axle on the non-drive side, clamping the motor body against the flat outer faces of the shell. The shell is no longer a bearing housing; it is a torque-reaction anchor. If the motor does not fit the shell correctly, the installation fails catastrophically.
B. Threaded vs. Press-Fit — the mechanical reality
| Attribute | Threaded (BSA) | Press-Fit (BB86 / BB92) |
|---|---|---|
| AttributeInternal design | Threaded (BSA)Spiral threads machined into the metal shell | Press-Fit (BB86 / BB92)Smooth, threadless bore |
| AttributeInternal diameter | Threaded (BSA)≈ 33.6–34.8 mm | Press-Fit (BB86 / BB92)41 mm (smooth) |
| AttributeShell width | Threaded (BSA)68 mm (road) / 73 mm (MTB) | Press-Fit (BB86 / BB92)86.5 mm (BB86) / 92 mm (BB92) |
| AttributeMotor fit | Threaded (BSA)33.5 mm axle slides through with near-zero radial play — locknuts clamp the flat faces | Press-Fit (BB86 / BB92)33.5 mm axle floats in a 41 mm bore — 7.5 mm of dangerous play |
| AttributeRequired axle | Threaded (BSA)68/73 mm | Press-Fit (BB86 / BB92)100 mm (standard axle disappears inside shell) |
| AttributeAdapter hardware | Threaded (BSA)None | Press-Fit (BB86 / BB92)CNC reducer bushings + spacer kit |
| AttributeVerdict on Level | Threaded (BSA)🟢 Native, safest interface | Press-Fit (BB86 / BB92)🟡 Requires full press-fit hardware |
The TOSEVEN motor axle is machined to 33.5 mm, natively designed to slide through a BSA shell with virtually zero radial play. Because nearly all Kross Level frames use a BSA 73 mm threaded shell, the motor drops directly in — no reducer bushings, no extended axle. This is the safest and most mechanically sound conversion interface possible.
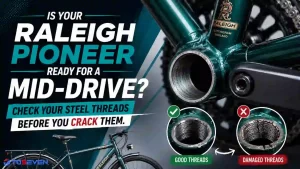
C. Shell measurement & inspection procedure
- Remove the existing bottom bracket. Use the correct BB tool for your shell type to extract the crankset and BB cups entirely.
- Identify the standard. Visible internal threads → BSA threaded. Smooth bore → press-fit. This single observation determines your entire hardware order.
- Measure shell width face-to-face. Use a caliper across the outer faces. ~68 mm or ~73 mm → standard axle. ~86.5 mm or ~92 mm → 100 mm axle.
- Measure internal diameter. ~33.6–34.8 mm (threaded) or 41 mm (press-fit bore).
- Inspect thread condition. On threaded shells, check for stripped, corroded, or cross-threaded sections. Damaged threads must be chased or re-tapped before install.
- Check face flatness. Faces must be flat and parallel. Out-of-tolerance faces create point contact under the lockring — have the shell professionally faced before mounting.
D. Torque transfer, anti-rotation & thread engagement
Once clamped, the motor reacts its drive torque into the frame through the lockring clamp faces and an anti-rotation bracket/tab that ties the motor body to a fixed frame point (typically a chainstay or down-tube boss). On a threaded Level shell the lockring torque can safely be increased to 60–80 Nm on aluminum to positively prevent motor rotation. On any carbon shell, the lockring is capped at 35–40 Nm and the anti-rotation bracket carries proportionally more of the reaction load.
Skipping the bushings: a 33.5 mm axle in a 41 mm bore floats freely. On the first hard acceleration the motor pivots violently, grinding and gouging the inner shell wall into an unrepairable oval.
Skipping the spacer kit: with a 100 mm axle in a 92 mm shell, the lockring bottoms out on the unthreaded axle shoulder before contacting the frame face. The wrench feels tight, but the motor is mechanically loose and tears the bushings out under load.
E. Mechanical loading on a cross-country hardtail
A Level used for its intended purpose sees a loading spectrum no road frame experiences: repeated impact loading from roots and rock gardens, high-frequency vibration, and standing climb torque spikes. With a mid-drive added, the BB junction becomes the primary stress-concentration zone for both rider input and motor reaction. Aluminum’s isotropic strength and the Level’s hydroformed, reinforced BB junction absorb this well, but the build must respect three rules: correct lockring torque, a properly seated anti-rotation bracket, and periodic re-torque verification. Fatigue cracking on a converted hardtail almost always originates from a loose motor producing micro-movement at the BB face — not from the steady-state torque itself.
05. Chainline, Drivetrain & Clearance Engineering
Because the motor adds substantial tension to the chain, even a slight diagonal bias will cause skipping or front-chainring derailment. On the Kross Level, chainline is dominated by one variable: Boost vs. non-Boost rear spacing.
A. Chainline optimization & chainring offset
B. Clearance verification
- Crank-arm clearance: confirm the TOSEVEN crank arms clear the chainstays through a full rotation.
- Chainstay interference: the Level’s ~447 mm stays give good rearward room; on XS/S frames verify the motor’s secondary gear housing (≈ 133 mm diameter) does not contact the chainstay before the motor seats — add a drive-side spacer if it does.
- Heel clearance & Q-factor: mid-drive Q-factor is wider than a stock XC crankset; confirm comfortable heel clearance, especially for narrow-stance riders.
- Front chainring position: with the offset ring fitted, sight the chain run from rear: it should sit parallel to the frame centerline in the middle cassette cogs.
C. Drivetrain compatibility
| Drivetrain | Type | Compatibility | Engineering Note |
|---|---|---|---|
| DrivetrainShimano Altus / Acera (1.0–3.0) | Type2×9 / 1×9 | Compatibility🟢 Compatible | Engineering NoteEntry drivetrains — DM02 manual-shift discipline protects HG200/HG53 chains. |
| DrivetrainShimano Deore | Type1×10 / 1×12 | Compatibility🟢 Compatible | Engineering NoteRobust; excellent pairing with DM01 shift sensor. |
| DrivetrainShimano SLX | Type1×12 | Compatibility🟢 Compatible | Engineering NoteWide-range cassette ideal for assisted climbing. |
| DrivetrainShimano XT | Type1×12 | Compatibility🟢 Compatible | Engineering NoteHighest shift precision under motor load. |
| DrivetrainSRAM NX | Type1×11 / 1×12 | Compatibility🟢 Compatible | Engineering NoteEagle ecosystem; confirm offset chainring for Boost. |
| DrivetrainSRAM GX | Type1×12 | Compatibility🟢 Compatible | Engineering NoteStrong derailleur clutch resists chain slap off-road. |
| DrivetrainModern 1× (general) | Type1×10–1×12 | Compatibility🟢 Preferred | Engineering NoteSimplest chainline; recommended for conversions. |
| DrivetrainTraditional 2× MTB | Type2×9 / 2×10 | Compatibility🟡 Workable | Engineering NoteFront mech retained but mid-drive ring is single — convert to 1× where possible. |
D. Wear reduction & reliability methods
- Run the correct offset ring and a centered motor to minimize cross-chaining angle and chain stress.
- Use a clutch-equipped rear derailleur (Deore+ / GX+) to suppress chain slap and derailment on rough trail.
- Maintain a 0.5–0.75% chain-wear replacement threshold — motor torque accelerates chain elongation versus an acoustic bike.
- On DM02 builds, master the pre-shift pedal pause to prevent shifting under load — the primary cause of skipped/snapped chains.
06. Frame Materials & Structural Engineering
The Kross Level’s defining advantage as a conversion platform is its aluminum construction. This section covers the material physics that make the alloy Level robust and the legacy carbon frame restrictive.
A. Hydroformed aluminum — the load story
Level alloy frames use hydroformed, butted tubing with reinforced junctions at the head tube, down tube, and BB shell. Aluminum’s isotropic strength — equal in all directions — is exactly what a mid-drive needs: the localized clamping and twisting loads of the motor block are distributed through the shell walls without the directional weakness carbon exhibits across its laminate plies. The reinforced BB junction acts as the torque-reaction node, and weld/reinforcement strategies at this junction give the alloy Level its high fatigue resistance under repeated off-road loading.
| Region | Primary Load | Mid-Drive Consideration |
|---|---|---|
| RegionBB shell | Primary LoadMotor reaction torque + clamp | Mid-Drive ConsiderationHighest stress zone; isotropic alloy handles 160 Nm DM01 safely. Re-torque periodically. |
| RegionDown tube | Primary LoadBending + battery mass | Mid-Drive ConsiderationMotor braces against it; battery mounts add static load — verify bottle-boss strength. |
| RegionChainstays | Primary LoadDrive torque path | Mid-Drive ConsiderationCarries chain tension reaction; confirm housing clearance on small sizes. |
| RegionHead tube | Primary LoadSteering + braking | Mid-Drive ConsiderationHeavier system mass raises braking demand — upgrade rotors. |
| RegionSeat tube | Primary LoadRider load | Mid-Drive ConsiderationLargely unaffected; standard 27.2 mm post retained. |
The legacy carbon Level XC frame (~970 g) is optimized for the pulling forces of pedaling, not the localized crushing/twisting of a metal motor block. DM01 (160 Nm) is prohibited. Use DM02 (90 Nm) only, with interface pads and a 35–40 Nm lockring limit, and have any older carbon shell professionally faced before mounting to avoid point-contact resin cracking.
Aluminum resists corrosion well, but the BB shell sees mud, water, and salt off-road. Apply anti-seize to threaded interfaces, keep the anti-rotation bracket free of grit, and inspect the shell faces seasonally to preserve frame longevity under repeated wet-weather loading.
07. TOSEVEN DM01 & DM02 Integration Engineering
This section covers the physical and electrical installation of the motor, controller, harness, and battery on the Kross Level.
A. Motor mounting geometry & anti-rotation
- Slide the 33.5 mm axle (correct length for your shell) through the cleaned, prepped shell.
- Rotate the motor body upward to brace against the down-tube; verify chainstay and ground clearance through the full rotation.
- Seat the anti-rotation bracket against its fixed frame point — this carries reaction torque and prevents the motor from spinning under load.
- Thread and torque the lockring: 60–80 Nm on aluminum, 35–40 Nm on carbon (calibrated wrench).
- Re-verify clearance and chainline before fitting the chain.
| Interface | Aluminum Level | Carbon Level | Notes |
|---|---|---|---|
| InterfacePrimary lockring | Aluminum Level60–80 Nm | Carbon Level35–40 Nm | NotesCalibrated torque wrench; anti-seize on alloy threads. |
| InterfaceAnti-rotation bracket bolt | Aluminum Levelper TOSEVEN spec | Carbon Levelper TOSEVEN spec | NotesThread-lock; re-check after first 50 km. |
| InterfaceChainring bolts | Aluminum Level8–10 Nm | Carbon Level8–10 Nm | NotesVerify offset value (Boost = 9 mm). |
| InterfaceBattery mount bolts | Aluminum Level5–6 Nm | Carbon Level5–6 Nm | NotesDo not exceed boss rating on alloy. |
B. Wiring architecture, harness routing & protection
- Route the harness alongside existing cable runs; keep all connectors clear of the motor body and rotating crank.
- On Level frames with BB-exit cable ports, sleeve cables in protective conduit and leave a relief gap so cable tension is never transmitted to the torque sensor.
- Position the controller (where external) in a ventilated, splash-protected location — typically under the down-tube or behind the head tube.
- Seal every connector; apply dielectric grease and confirm strain relief for vibration and wet-weather operation.
If a brake hose or shift cable is crushed between the motor casing and the frame, its constant tension mimics leg pressure on the torque sensor, producing erratic surging power. This is the most common post-install fault on internally-routed frames. Re-route all cables around the motor block with conduit before final tightening.
C. Battery placement, CoG & handling
Mount the battery low and central on the down tube to keep the center of gravity low and rearward-biased. On XS/S Level frames with a compact front triangle, verify the pack clears the motor and cables; underside-of-down-tube mounting is the fallback. The added ~8 kg system mass lowers the CoG and improves planted feel on climbs, but increases braking demand. Because the Level is a hardtail, there is no rear suspension linkage sweeping through the motor zone, eliminating the clearance test required on full-suspension platforms.
D. Braking, thermal & water-resistance
- Brakes: upgrade to 180 mm (front) / 180 mm or 160 mm (rear) rotors to arrest the added mass; verify stock calipers are rated for sustained descent heat at assisted speeds.
- Thermal: keep the motor body unobstructed for airflow; avoid wrapping it in protective film that traps heat.
- Water resistance: seat all seals, confirm drain paths, and avoid pressure-washing the BB area directly.
08. Cross-Country, Trail & Daily Reliability Engineering
A converted Kross Level must perform across the disciplines it was designed for. This section covers real-world reliability engineering for off-road and daily use.
| Use Case | Primary Stressor | Engineering Focus |
|---|---|---|
| Use CaseCross-country racing | Primary StressorSustained climb torque | Engineering FocusDM01 for power; chain-wear monitoring; brake heat management. |
| Use CaseMarathon / long-distance trail | Primary StressorBearing fatigue, range | Engineering FocusSealed connectors; battery thermal headroom; periodic re-torque. |
| Use CaseForest trails / mountain exploration | Primary StressorMud, water, impact | Engineering FocusMud-contamination sealing; anti-rotation bracket cleanliness. |
| Use CaseGravel / mixed terrain | Primary StressorVibration | Engineering FocusThread-lock fasteners; cable conduit to prevent chafe. |
| Use CaseBikepacking | Primary StressorStatic load + range | Engineering FocusRack-ready Level PW geometry; verify boss load ratings. |
| Use CaseDaily recreational | Primary StressorFrequent stop/start | Engineering FocusDM02 smoothness; serviceability and connector inspection. |
- Wet-weather & mud: seal connectors, keep drain paths clear, and clean the BB area without high-pressure water.
- Bearing longevity & vibration: verify lockring torque and anti-rotation seating periodically — micro-movement is the enemy.
- Noise reduction: a centered motor, correct chainline, and clutch derailleur eliminate most drivetrain noise.
- Serviceability: the threaded BSA interface allows straightforward motor removal/reinstall for service — a key advantage of the alloy Level.
09. Maintenance Engineering & Lifecycle Management
A mid-drive Kross Level requires a disciplined preventive-maintenance program. The threaded interface makes service accessible, but the added torque and mass demand more frequent verification than an acoustic bike.
| Task | First Check | Routine Interval | Action |
|---|---|---|---|
| TaskLockring torque verification | First CheckAfter 50 km | Routine IntervalEvery 500 km / season | ActionRe-torque to spec (60–80 Nm alu / 35–40 Nm carbon). |
| TaskAnti-rotation bracket | First CheckAfter 50 km | Routine IntervalEvery 500 km | ActionCheck seating & bolt torque; clean grit. |
| TaskChain wear | First Check250 km | Routine IntervalEvery 250 km | ActionReplace at 0.5–0.75% elongation. |
| TaskChainline / offset ring | First CheckInstall | Routine IntervalOn chain replacement | ActionRe-verify alignment. |
| TaskConnector inspection | First Check250 km | Routine IntervalMonthly / after wet rides | ActionDielectric grease; check seals. |
| TaskBattery health | First CheckInstall | Routine IntervalEach charge cycle / seasonal | ActionStore 30–60% charge; avoid full discharge. |
| TaskMotor inspection | First Check500 km | Routine IntervalAnnual | ActionCheck play, noise, water ingress. |
| TaskBrake / rotor inspection | First Check250 km | Routine IntervalEvery 250 km | ActionPad wear & rotor heat (upgraded rotors). |
| TaskBB shell faces | First CheckInstall | Routine IntervalAnnual / on removal | ActionInspect flatness; face if needed. |
A. Long-term ownership
- Seasonal planning: deep-service before and after the wet season; store the battery partially charged in a temperate location.
- Torque verification culture: the single highest-value habit — a properly torqued, properly braced motor will outlast the frame.
- Drivetrain lifecycle: budget for more frequent chain/cassette replacement than an acoustic bike under the same mileage.
10. Mistakes That Can Destroy Your Build
These are the failure modes most likely to appear on Kross Level conversions. The Level’s forgiving aluminum architecture narrows the risk surface — but four mistakes still routinely ruin builds.
1 — Installing the DM01 on the legacy carbon Level frame. The 160 Nm output crushes the carbon BB shell. Carbon = DM02 only, no exceptions.
2 — Ignoring Boost chainline. Fitting a 0 mm-offset ring on a Boost 148 mm Level pulls the chain at a severe angle, causing chronic skipping and front-ring derailment under power.
3 — Pinching internal cables at the BB. Crushed cables feed false tension to the torque sensor, producing surging, jerky power that cannot be tuned out without re-routing.
4 — Assuming press-fit hardware on a threaded shell (or vice versa). Order hardware only after physically inspecting the shell. A standard 73 mm axle disappears in a 92 mm press-fit shell; press-fit bushings are useless in a threaded shell.
- Skipping the 3-second calibration — corrupts the torque-sensor baseline; power off, wait 10 s, restart with feet off the pedals.
- Under-torquing the lockring on aluminum — a loose motor produces micro-movement and accelerates BB-face fatigue. Use 60–80 Nm on alloy.
- Not upgrading brakes — added mass + assisted speed exceeds the stock entry-tier braking envelope on lower Level trims.
- Over-spacering the drive side (press-fit builds) — pushes the chainring outboard and ruins chainline.
11. FAQ & Troubleshooting
A. My Kross Level is aluminum. Does that guarantee a threaded BSA shell?
On the great majority of alloy Level hardtails, yes — the shell is BSA 73 mm threaded and the motor drops in with no adapter hardware. However, model year and generation vary, and a small number of press-fit-equipped generations exist. Always remove the BB and inspect: visible threads = BSA; smooth bore = press-fit. Order hardware only after this inspection.
B. Can I run the high-power DM01 on my Level?
Yes — on any aluminum Level. The isotropic alloy handles the full 160 Nm safely, and the DM01’s integrated shift sensor suits aggressive XC climbing. On the legacy carbon Level frame the DM01 is strictly prohibited; use the DM02.
C. My chain skips or drops since the conversion. What’s wrong?
Almost always chainline. If your Level is a Boost 148 mm frame, you must use a 9 mm-offset chainring — a flat 0 mm ring pulls the chain outward. Also confirm the motor is centered in the shell (and not over-spacered on the drive side). A clutch rear derailleur further reduces derailment off-road.
D. The motor feels jerky or surges. What did I do wrong?
Two usual causes. First, the 3-second calibration was violated — power off, wait 10 seconds, restart with all weight off the pedals. Second, an internal cable is pinched against the motor at the BB exit, feeding false tension to the torque sensor. Re-route every cable around the motor block with protective conduit.
E. Do I need a shift sensor for the DM02?
No — it is neither required nor included. The DM02’s 90 Nm output is low enough that disciplined manual shifting is sufficient: ease off the pedals for a split second before each shift. The DM01 includes a mandatory shift sensor because 160 Nm would otherwise snap chains during shifts.
F. Is the conversion easier than on a full-suspension bike?
Yes. The Level is a hardtail, so there is no rear suspension linkage sweeping through the BB area — the mandatory suspension-clearance test required on full-suspension platforms does not apply. The threaded shell and rigid alloy rear make the Level one of the most straightforward conversion platforms in mountain biking.
G. What’s the most common ordering mistake on Level conversions?
Ordering hardware before inspecting the shell. If a rare press-fit Level is treated as threaded (or vice versa), the parts will not fit — a 73 mm axle disappears in a 92 mm press-fit shell. Measure shell width face-to-face and identify thread vs. smooth bore first.
H. Do I need to upgrade the brakes?
On lower Level trims, yes. The added ~8 kg system mass and higher assisted speeds exceed the stock entry-tier braking envelope. Upgrade to 180 mm rotors and confirm caliper heat rating before riding at full output, especially for descending.
Per-generation bottom-bracket standard and exact hub spacing must be confirmed against your specific Kross Level model year before ordering. Kross publishes full specifications per model on its official site; the BB type and Boost/non-Boost spacing tables in this guide reflect the prevailing standards for the alloy Level hardtail line and the class-standard inference for threaded shells, not a per-SKU factory datasheet for every generation. The shell-inspection procedure in Section 04 is the authoritative final check.